Tuesday, December 1, 2009

Fall Leaves

Well its that time a year when you are looking for cute inexpensive decorations for the holidays, I ran across a simple design that you can do with your kids or having a relaxing craft moment alone. My design is even more simple than the one I found, they used brown yarn and glue to make the tree, but I chose to make it simple and paint the design.
Fall leaf placemat for your holiday decor- you also could do a Christmas tree shape and do different color dots for Christmas bulbs. Here are the easy step by step directions!
Cut with pinking sheers a light weight tan fabric the size of a standard placemat, I just laid my over the top and cut the shape out. I also did a double layer and did a simple stitch around the edge, but you can skip this step if you are using a heavier fabric. (I wanted cheap so I used what I had around the house)
I used a basic black acrylic paint to paint the shape of my tree. The paint is thick so you only need to do one coat!
Paint the trunk first the length on the placemat.
Add branches to your tree.
Here's what it looks like on the placemat! (if you wanted to do a Christmas tree, I would use green paint for the tree, and make a center line for the trunk and do three horizontal lines across the tree making a triangle shape in the process.)
Now let all the trees dry completely before starting the next step. I waited about three hours, did some dishes, made some cookies J/K but be sure to wait!
Next, I used some great fall colors for leaves!
The next part is the fun part you can have your kids help you with, my son who is four helped me with about 3 of them and then he was done, so I was left with 9 of them to complete! Place all the colors of paint onto a plate and start using your fingers to make thumbprint leaves! Kids love to get their hands messy, so let them have fun! On this mat my son did all the green leaves first!
Now you are all done and now its time to set up for dinner! (Be sure to let them dry over night to make sure all the paint is dry before using them at your next family gathering!)
thanks, enjoy crafting simple...
Beckymae

Wednesday, November 18, 2009

Woodscape with a Cardinal flare!

A baby room like no other baby room! I was looking through an old Martha Living magazine called Baby and found a baby room so beautiful I could not wait to get it started for our own little guy. All the colors were neutral and had a flare of red as the accent color, I just loved it. I really wanted red as well, so I decided on a red cardinal, which is really hard to find for a baby's room, lucky my mother-in-law had these handmade pillows made by her mother that just made the room super cute. Here is a list of projects I did to create my woodscape baby room!
I striped the chair and painted it white! Added the cute pillow and a red Ikea trashcan. Great little reading nook for baby "E".
I hand stitched two pictures for the room with matching fabric from his bedding, one cute tree picture and a fun bird picture.
Created three hand sewn blocks from felt in red, white and tan colors. I used 1-10 numbers and stars shapes on the blocks, will be great to play with when the little guy gets older.
Here is an up close shot of my hand stitched bird picture!
Revamped lamp shade, punched holes in the bottom of the shade and ran red satin ribbon through it. Then I hot glued a red ribbon on top adding loops to it creating a fun look!
Great find for 4 bucks at the local thrift store, spray painted white and added a red cardinal in the cage, just a fun piece to dress up the room even more.
Got old frames and painted them white, then I added some old pictures, as well as leaves I collected. Great collage on the wall.
Hand stitched mobile, I could not find anything that went well with the room, so I created my own.
Up close details of the bird!
The final area is the crib. All the bedding was handmade by my sweet mother-in-law in white, tans and rich browns. I made a cute flag banner using old linens and we also got a cute name picture that I hung above his bed. (not seen in the picture)
Well I hope you like the room, I do. Creating something handmade makes everything more personal for your family. Enjoy!
Beckymae

Saturday, November 14, 2009

What a combo!

Spiderman, a pirate, princess and a cute butterfly!

Love to eat Woopies

History of Whoopie Pies
Whoopie pies are considered a New England phenomenon and a Pennsylvania Amish tradition. They're one of Maine's best known and most loved comfort foods. Mainers will even claim that they were weaned on whoopie pies. In Maine, these treats are more like a cake than a pie or a cookie, as they are very generously sized (about hamburger size). they're so hug that you'll want to share one with a friend. A big glass of milk is almost mandatory when eating a whoopie pie.
A whoopie pie is like a sandwich, but made with two soft cookies with a fluffy white filling. Traditional whoopies pies are made with vegetable shortening, not butter. The original and most commonly made whoopie pie is chocolate. but cooks like to experiment, and today pumpkin whoopie pies are a favorite seasonal variation.
The recipe for whoopie pies has its origins with the Amish, and in Lancaster county, Pennsylvania, it is not uncommon to find roadside farm stands offering these desserts. Amish cooking is about old recipes that have fed families for generations, with no trendy or cross-cultural fusions or mixtures. These cake-like whoopie pies were considered a special treat because they were originally made from leftover batter. According to Amish legend, when children would find these treats in their lunch bags, they would shout "Whoopie!"


Whoopie Pie Recipe - How To Make Whoopie Pies
1/2 cup solid vegetable shortening
1 cup firmly packed brown sugar
1 egg
1/4 cup cocoa
2 cups all-purpose flour
1 teaspoon baking powder
1 teaspoon baking soda
1 teaspoon salt
1 teaspoon vanilla extract
1 cup milk
Preheat oven to 350 degrees F. Lightly grease baking sheets.

Whoopie Pie Filling:
1 cup solid vegetable shortening*
1 1/2 cups powdered sugar
2 cups Marshmallow Fluff**
1 1/2 teaspoons vanilla extract
* Butter may be substituted for all or part of the vegetable shortening, although traditional Whoopie Pies are made with vegetable shortening only
** Marshmallow Creme may be substituted.
In a medium bow, beat together shortening, sugar, and Marshmallow fluff; stir in vanilla extract until well blended.
Directions:
In bowl, combine cocoa, flour, baking powder, baking soda, and salt.
In another large bowl, cream together shortening, sugar, and egg

In a small bowl, stir the vanilla extract into the milk. Add the dry ingredients to the shortening mixture, alternating with the milk mixture; beating until smooth.

Drop batter by the 1/4 cup (to make 18 cakes) onto prepared baking sheets. With the back of a spoon spread batter into 4-inch circles, leaving approximately 2 inches between each cake. Bake 15 minutes or until they are firm to the touch. Remove from oven and let cool completely on a wire rack.

Make Whoopie Pie Filling. When the cakes are completely cool, spread the flat side (bottom) of one chocolate cake with a generous amount of filling. Top with another cake, pressing down gently to distribute the filling evenly. Repeat with all cookies to make 9 pies. Wrap whoopie pies individually in plastic wrap, or place them in a single layer on a platter (do not stack them, as they tend to stick).
To freeze, wrap each whoopie pie in plastic wrap. Loosely pack them in a plastic freezer container and cover. To serve, defrost the wrapped whoopie pies in the refrigerator.


Enjoy your woopies! I had tons of fun making them and so will you!
Beckymae

Tuesday, November 3, 2009

This Saturday!

~You are warmly invited to join me for~
An Uncommon Holiday Show & Sale
This Saturday, November 7th, 3pm-8pm
Georgetown Chamber of Commerce 100 Stadium Dr.
Across from the Rec Center on Austin Ave.
Shop fabulous products!
Sample gourmet delights!
Connect with excellent services
All provided by local women in small business!
Click here for a list of our wonderful vendors and get some early shopping ideas!
Join us for a fun evening of classy Christmas festivities!
I'd love to see you there!
Visit UncommonWomen.net for more details!

Monday, November 2, 2009

Baby is almost here!

I dear friend of my took some great fall pictures of me being 7 1/2 months pregnant, I was so excited to see them! She did such a great joy capturing me in the fall with this cute little bundle of joy growing inside me. I have been working really hard this pregnancy to stay fit and it pays off after looking at the pictures she took of me. My husband really enjoyed my look, especially with my hair blowing in the wind!


Well we are to report about 6 to 8 weeks left before baby "E" arrives into this world, and we are all ready and waiting.
Room done: check
Clothes washed: check
Birth plan done: check
Diaper bought: check
What's left to do....I do want to make a cute swaddle wrap, so I have been drawing up designs for the creation...


Thursday, October 29, 2009

Being Inspired!

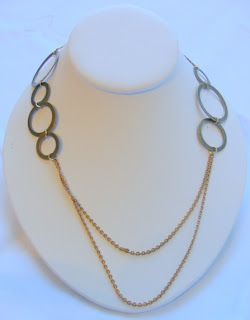
The great look of the fall is so much fun! My favorite things I now see on clothing as well as jewelry. It's the mix of a modern look with a vintage flare! Lots and lots of lace, pearls and mixing chains! I just saw today at Old Navy that they had tank tops with ruffled lace and ribbon down the front of the shirts which brings me back to my point, mixed fashion is great!
In other News......
I will be doing some show early November if you would like to see more of my new creations.
Georgetown Chamber of Commerce Christmas Fest
November 7
from 3-8 pm
Totally free...I may even have some wine
Over 35 vendors!
Also...
Christmas Fest
First Baptist Church on HWY 29
November 12-14
from 9-4 pm
Over 65 vendors.....door prizes hourly and great big gift baskets that they are raffling to help raise money for my son's Mother's Day Out program.


So I saw on Anthropologie these great new necklaces that I was so inspired by that, that I decided to whip me up some for my shop to sell at my up coming shows. I tell you the price for a necklace on Anthropologie you can buy like 5 necklaces from my shop on etsy.
Plus mine are really handmade...I love how that's always added to the description, but yet there are probably thousands available.


Another Inspired creation..
Enjoy,
Beckymae

Tuesday, October 20, 2009

What I have been up to Lately!

Roses are red... you know the saying! Well, I am working on a special project for myself, which I never do, so I am needing to make about 20 of these beautiful roses in two shades of red that I will be adding to a black scarf. I can't wait to see how they turn out. After I am finish maybe I will write something up so everyone else can make themselves one for the winter season...


I love poppies, I now will have poppy headbands at my two shows (look for details soon on the shows!) in November as well as poppy earrings, poppy necklaces, poppy phone charms, poppy hair clips and whatever else I can come up with that is poppy!
Happy Halloween, look at these cute little witches legs coming out of this fun pillowcase dress I made for one of my dear friend's daughter. It was so easy and fun, since I only have a boy and will only have boys is always fun to do some girly stuff, if you need anything just stop by the shop and make a request, I am always looking for new things to create!
Here is that sweet princess and her beautiful halloween dress! What a smile!
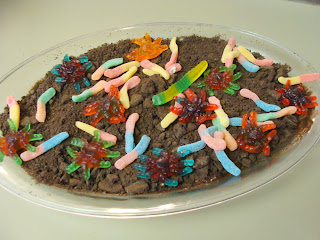
Anyone want to eat scary dirt! We went to our first halloween party of the year and I made some yummy dirt pudding! It's so easy to make and kids love the idea of eating all kinds of weird stuff!